Client Access Role
The Client Access Role is similar to the role a Front-End server would play in an Exchange 2000/2003 organization. The Client Access server is the server that users connect to with their mail client, mobile device, or web browser. The Client Access server handles all connections whether they come from an application such as Outlook 2003 or 2007, Outlook Express, or any other MAPI, POP3 or IMAP4 client. The Client Access server also handles connections made from mobile devices such as a Windows Mobile 5 Smartphone, or any other device using Exchange ActiveSync. Exchange ActiveSync in Exchange 2007 supports all devices with PocketPC 2002/2003 and Windows Mobile 5. Figure 2 shows how all the clients and roles connect to each other.


Figure 2: Exchange 2007 Client Access
This role also provides Outlook Web Access (OWA). OWA allows a user to access his or her mailbox from a web browser and have full access to all the information in the mailbox including task lists, calendar information, mail items and public folders. One of the hot new functions of OWA is Sharepoint and UNC access. Now users can access UNC shares (\\servername\share) and Sharepoint document libraries reducing the need for complex VPN configurations
Overview of Exchange Server 2007 CAS Proxying and Redirection
In a Microsoft Exchange Server 2007 organization, a computer that is running Exchange 2007 that has the Client Access Server role installed can act as a proxy for other Client Access Servers within the organization. This is useful when multiple Client Access Servers (CAS) is present in different Active Directory sites in an organization and only one is exposed to the Internet.
Note: In case the Active Directory does not have multiple sites, you do not have to configure Exchange 2007 for proxying or redirection.
A Client Access Server can also perform redirection for Microsoft Office Outlook Web Access URLs. Redirection is useful when a user is connecting to a Client Access Server that is not in their local Active Directory site. Each site would have to have an Internet-facing CAS server with the ExternalURL set. Having the ExternalURL set is not a default configuration in Exchange 2007.
This topic explains how Client Access Server Proxying, Redirection and "Find the Best CAS" work, when each is used, and how to configure your Client Access Servers for different scenarios.
Understanding CAS Proxying
In Exchange 2003, the front-end server communicates with the back-end server over HTTP. In Exchange 2007, the Client Access Server communicates with the mailbox server over RPC.
It is a requirement to have a Client Access Server in each site where there is an Exchange 2007 Mailbox Server. The recommendation is to have the Client Access Server as the first Exchange 2007 Server role installed in each Active Directory site. If you were to just have a Mailbox Server role in any given site without a Client Access Server no users would be able to connect to their mailboxes via Outlook Web Access, ActiveSync, Exchange Web Services, POP3 and IMAP4.
The Client Access Server can be configured for internal access or can be Internet-facing named "First CAS". If there is no Internet-facing Client Access Server in the same site as the mailbox, then the request will be proxied from the Internet-facing Client Access Server to the internal Client Access Server named "Second CAS". All the traffic between First CAS and Second CAS is over http(s).
Note: By default Exchange 2007 installs a self certificate when you install the Client Access Server role. As a recommendation you should install a public or a private certificate.
Proxying is supported for clients that use Outlook Web Access, Exchange ActiveSync, Exchange Web Services, and the Availability service.
An Exchange 2007 Client Access Server can proxy requests in the following two scenarios:
Between Exchange 2007 Client Access Servers
Organizations that have multiple Active Directory sites can designate one Client Access Server as an Internet-facing server, named "First CAS", and have that server proxy requests to Client Access Servers in sites that have no Internet presence, named "Second CAS". The First CAS then proxies the request to the Client Access Server that is closest "Second CAS" to the user's mailbox. This is known as CAS-CAS proxying as we can in see the following illustration:

The mailbox of User2 is located on a mailbox server MBX2 in a remote active directory site without presence on the Internet. When the User2 accesses his mailbox via OWA or ActiveSync, the First CAS which is present on the Internet receives the request and then proxies to the Second CAS in the same AD site where the User2 mailbox is located.
Note: Integrated Windows authentication for /owa virtual directory must be enabled via Exchange Management Console or Exchange Management Shell on the Second CAS. For /Microsoft-Server-ActiveSync virtual directory on Exchange 2007 SP1, you can enable via Exchange Management Shell via cmdlet Set-ActiveSyncVirtualDirectory.
Between an Exchange 2007 Client Access Server and an Exchange Server 2003 Back-end server
Proxying requests between an Exchange 2007 Client Access server and a Microsoft Exchange Server 2003 front-end server enables Exchange 2007 and Exchange 2003 to coexist in the same organization. External clients who connect to Outlook Web Access by using the /Exchange virtual directory or connect to Exchange ActiveSync by using the /Microsoft-Server-ActiveSync virtual directory will have their requests proxied to the appropriate Exchange 2003 back-end server (click to see a bigger version):

The above illustration presents the scenario where the mailbox of User2 is located on Exchange 2003 back-end server in an Active Directory remote site. When the User2 access his mailbox via OWA or ActiveSync, the First CAS proxies the request not to the Second CAS or any Exchange 2003 front-end server but straight to the Exchange 2003 back-end server via http where the user mailbox is located. If the mailbox is located on a Exchange 2003 back-end server in the same Active Directory site as the CAS, such as User1, the First CAS proxies the request straight to the Exchange 2003back-end server via http.
Note: Integrated Windows authentication for /Exchange and /Microsoft-Server-ActiveSync virtual directories must be enabled via Exchange System Manager on Exchange 2003 back-end server.
Proxying and Redirection both do not support virtual directories that use Basic authentication. For client communications to be proxied or redirected between virtual directories on different servers, Integrated Windows authentication must be turn on the Second CAS for /owa and /Microsoft-Server-ActiveSync, as well as on an Exchange 2003 back-end server for the virtual directories /Exchange and /Microsoft-Server-ActiveSync.
Note: CAS-CAS Proxying will not work for Post Office Protocol version 3 (POP3) or Internet Message Access Protocol version 4 (IMAP4) clients. A client who is using POP3 or IMAP4 must connect to a Client Access server in the same Active Directory site as their Mailbox server. If the user mailbox is located on a Exchange 2003 back-end server, POP3 and IMAP4 request will be proxied from CAS to Exchange 2003 back-end server.
Understanding CAS Redirection
Redirection is used when the organization has multiple Exchange 2007 Client Access Servers, in different Active Directory sites, facing to the Internet with the ExternalURL attribute enabled.
Outlook Web Access users who access an Internet-facing Client Access server that is in a different Active Directory site than the site that contains their mailbox can be redirected to the Client Access server that is in the same site as their Mailbox server if that Client Access server is Internet-facing. When Outlook Web Access users try to connect to a Client Access server that is outside the Active Directory site that contains their Mailbox server, they will see a Web page that contains a link to the correct Client Access server for their mailbox. The scenario bellow presents how redirection works for Outlook Web Access and ActiveSync users.
The mailbox of User2 is located on a mailbox server MBX2 in a remote Active Directory site where the Second CAS is Internet-facing, the ExternalURL attribute is set on for /owa virtual directory. When the User2 accesses his mailbox via OWA pointing to the First CAS. The First CAS checks if the ExternalURL is configured on the Second CAS. In this case the First CAS will return a web page that contains a link to the correct Client Access server for their mailbox, in the case, the Second CAS in AD Remote site.

The mailbox of User2 is located on a mailbox server MBX2 in a remote Active Directory site where the Second CAS is Internet-facing, the ExternalURL attribute is set on for /Microsoft-Server-ActiveSync virtual directory. When the User2 accesses his mailbox via ActiveSync pointing to the First CAS, the First CAS checks if the ExternalURL attribute is configure on the Second CAS. In this case the First CAS will return an HTTP error code 451 and an application Event ID 1008.
In this case, you have to recreate the partnership with the device pointing to the right Exchange 2007 Client Access Server.
Uncovering the Exchange ActiveSync Enhancements in Exchange Server 2007 Service Pack 1
Exchange Server 2007 Service Pack 1 (SP1) is packed with enhancements revolving around Exchange ActiveSync (EAS). As you will see throughout this article, a new default Exchange ActiveSync policy is included. Also, several new Exchange ActiveSync policy settings have been introduced. In addition, the Exchange Front End team in the Exchange Product group has made sure a remote wipe confirmation e-mail message is sent to the respective user’s mailbox once a wipe has been completed successfully, this so that the user is made aware that his/her mobile device has been reset to factory defaults. Finally, the Direct Push protocol has been enhanced. In essence, the data sent between the mobile devices and the Client Access server(s) have been reduced even further than is the case in the Exchange Server 2007 RTM version.
Note:
Most of the new Windows mobile device features and enhancements in Exchange Server 2007 SP1 requires Exchange ActiveSync protocol version 12.1. The EAS protocol included with Windows Mobile 6.0 RTM is version 12.0 meaning that your device will need an update before you can benefit from the new Exchange Server 2007 SP1 features and enhancements discussed in this article.
Most of the new Windows mobile device features and enhancements in Exchange Server 2007 SP1 requires Exchange ActiveSync protocol version 12.1. The EAS protocol included with Windows Mobile 6.0 RTM is version 12.0 meaning that your device will need an update before you can benefit from the new Exchange Server 2007 SP1 features and enhancements discussed in this article.
Note:This article is based on Exchange Server 2007 SP1 Beta 2. This means that the EAS features covered in this article still can change before Exchange Server 2007 SP1 RTMs.
New Default Exchange ActiveSync Policy Introduced
With Exchange Server 2007 SP1 a new default Exchange ActiveSync policy is added automatically during the installation of the Client Access Server role as shown in Figure 1 below. As most of you probably know you have to manually create and assign an EAS policy to user mailboxes in the Exchange 2007 RTM version, and since this does not match the overall secure-by-default strategy used in the Exchange product group, a default EAS policy has now made its way into the product.


Figure 1: Default Exchange ActiveSync Policy
Notice that even when you upgrade an existing Exchange 2007 server, with the Client Access Server role installed, to Exchange Server 2007 SP1, the new default Exchange ActiveSync policy will be created and assigned automatically to all Exchange 2007 user mailboxes that do not already have an EAS policy assigned (Figure 2).


Figure 2: Default Exchange ActiveSync Policy assigned to a User Mailbox
The new default EAS policy is configured rather loosely, which means it does not provide the security required in most Enterprise IT organizations (it even allows non-provisionable devices to synchronize with a mailbox), but it is better than no default policy at all. The default EAS policy is configured with the settings shown in Table 1. As you can see, a lot of policy settings in the table are new policies introduced in Exchange Server 2007 SP1, and we will take a closer look at these in the next section).
Exchange ActiveSync Policy Settings
|
Configured Value
|
AllowNonProvisionableDevices
|
True
|
AlphanumericDevicePasswordRequired
|
False
|
AttachmentsEnabled
|
True
|
DeviceEncryptionEnabled
|
False
|
RequireStorageCardEncryption
|
False
|
DevicePasswordEnabled
|
True
|
PasswordRecoveryEnabled
|
True
|
DevicePolicyRefreshInterval
|
Unlimited
|
AllowSimpleDevicePassword
|
True
|
MaxAttachmentSize
|
Unlimited
|
WSSAccessEnabled
|
True
|
UNCAccessEnabled
|
True
|
MinDevicePasswordLength
|
4
|
MaxInactivityTimeDeviceLock
|
00:30:00
|
MaxDevicePasswordFailedAttempts
|
8
|
DevicePasswordExpiration
|
Unlimited
|
DevicePasswordHistory
|
0
|
IsDefaultPolicy
|
True
|
AllowStorageCard
|
True
|
AllowCamera
|
True
|
RequireDeviceEncryption
|
False
|
AllowUnsignedApplications
|
True
|
AllowUnsignedInstallationPackages
|
True
|
AllowWiFi
|
True
|
AllowTextMessaging
|
True
|
AllowPOPIMAPEmail
|
True
|
AllowIrDA
|
True
|
RequireManualSyncWhenRoaming
|
False
|
AllowDesktopSync
|
True
|
AllowHTMLEmail
|
True
|
RequireSignedSMIMEMessages
|
False
|
RequireEncryptedSMIMEMessages
|
False
|
AllowSMIMESoftCerts
|
True
|
AllowBrowser
|
True
|
AllowConsumerEmail
|
True
|
AllowRemoteDesktop
|
True
|
AllowInternetSharing
|
True
|
AllowBluetooth
|
Allow
|
MaxCalendarAgeFilter
|
All
|
MaxEmailAgeFilter
|
All
|
RequireSignedSMIMEAlgorithm
|
SHA1
|
RequireEncryptionSMIMEAlgorithm
|
TripleDES
|
AllowSMIMEEncryptionAlgorithmNegotiation
|
RequireEncryptionSMIMEAlgorithm
|
MinDevicePasswordComplexCharacters
|
3
|
MaxEmailBodyTruncationSize
|
Unlimited
|
MaxEmailHTMLBodyTruncationSize
|
Unlimited
|
UnapprovedInROMApplicationList
|
{}
|
ApprovedApplicationList
|
{}
|
ExternallyDeviceManaged
|
False
|
MailboxPolicyFlags
|
0
|
Table 1: Exchange ActiveSync Policy Configuration Settings
You can see or modify the configured EAS policy settings on your Client Access Server by opening the Exchange Management Shell and typing Get-ActiveSyncMailboxPolicy –Identity “Default” or by opening the Default EAS policy property page in the Exchange Management Console.
When you have one or more custom EAS policies in addition to the default EAS policy, you have the option of setting one of the custom EAS policies as the default policy, so that policy will be assigned to all Exchange 2007 user mailboxes (Figure 3) instead of the default policy.


Figure 3: Specifying the Default Exchange ActiveSync Policy
Exchange ActiveSync Policy Setting Enhancements
As already mentioned, Exchange Server 2007 SP1 introduces several new EAS policies, which allow us to lock down and secure mobile devices even further than it was possible with the Exchange Server 2007 RTM version. We will take a look through the default EAS policy property page and see how each new policy affects the mobile devices in your Exchange Server 2007 organization. Let us start by opening the Exchange Management Console, and then click on the Client Access node under the Organization Configuration work center (shown in Figure 1). Since EAS policies are organization-wide, this is the place to create and modify them. Now right-click on the Default EAS policy, and then select Properties in the context menu. As you can see the property page consists of five tabs in Exchange Server 2007 SP1, and not two, which was the case in the Exchange Server 2007 RTM version. Introducing three additional tabs indicates that there are a lot of enhancements in Exchange Server 2007 SP1.
Let us begin by taking a quick look at the General tab shown Figure 4 below. Not much has changed here other than we now can see whether the respective policy is configured as the default, and that the Maximum attachment size (KB) setting has been replaced by a Refresh interval (hours) setting (the Maximum attachment size (KB) setting can now be found under the Sync Settings tab). With the Refresh interval (hours) setting we can specify how frequently mobile devices should be updated with the Exchange ActiveSync policy from the server.


Figure 4: General tab on the Default Exchange ActiveSync Property Page
Let us move on to the Password tab (Figure 5). As you can see the settings under this tab have almost been left untouched. Only one new setting has been added on this tab, and that is the Minimum number of complex characters settings, which allows us to specify the minimum number of complex characters our device password(s) should contain.


Figure 5: Password tab on the Default Exchange ActiveSync Property Page
Since I have covered all the policy settings under this tab in my Mobile Messaging with Exchange Server 2007 article series, there is no reason why I should do so again. So let us move on to the next tab which is the Sync Settings tab (Figure 6). Here we can configure how many past calendar and e-mail items should be synchronized to a device. We can also configure the limit message size, whether it should be allowed to synchronize while roaming, specify if html formatted email can be read on a device and finally whether it should be allowed to download attachments to a device and if it is, specify the attachment's maximum size.

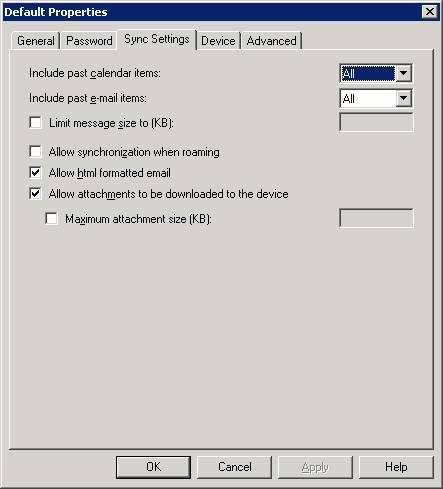
Figure 6: Sync Settings tab on the Default Exchange ActiveSync Property Page
The Sync Settings tab is new and I have listed each policy setting on this tab with a short description in Table 2.
Exchange ActiveSync Policy Setting
|
Description
|
Include Past Calendar items
|
With this setting you can specify how far back calendar items should be kept on the mobile device. You can choose between All, Two Weeks, One Month, Three Months and Six Months.
|
Include past e-mail items
|
With this setting you can specify how far back e-mail items should be kept on the mobile device. You can choose between All, One Day, Three Days, One Week, Two Weeks and One month.
|
Limit message size to (KB)
|
With this setting you can specify a maximum size for e-mail messages that you are allowed to synchronize to a mobile device.
|
Allow synchronization when roaming
|
With this setting you can allow or prohibit users from synchronizing their mobile devices when roaming.
|
Allow html formatted email
|
With this setting you can specify whether or not your mobile device users should be allowed to read html formatted e-mail message on their device(s).
|
Allow attachments to be downloaded to the device and maximum attachment size (KB)
|
With this setting you can specify whether or not your mobile device users should be able to download e-mail message attachments to their mobile device(s). In addition, you can set a maximum size for attachments that can be downloaded to the mobile devices.
|
Table 2: Exchange ActiveSync Policy Configuration Settings
Let us move on to the Device tab (Figure 7). On this tab, we can disable mobile device features such as removable storage cards, built-in camera, Wi-Fi, the infrared port, Internet sharing, remote desktop, Desktop ActiveSync client synchronization, and Bluetooth.


Figure 7: Device tab on the Default Exchange ActiveSync Property Page
The Device tab is new and I have listed each policy setting on this tab with a short description in Table 3 below.
Exchange ActiveSync Policy Setting
|
Description
|
Allow removable storage
|
You can specify whether or not the mobile device users should be allowed to use a removable storage card (mini SD data card) as data repository in their mobile devices.
|
Allow camera
|
You can prohibit your mobile device users from using the camera, which is included with most Windows mobile devices.
|
Allow Wi-Fi
|
With this setting you can prohibit your mobile device users from using Wi-Fi (wireless network card), which is included with most Windows mobile devices.
|
Allow infrared
|
With this setting you can prohibit your mobile device users from using the infrared port, which is included with most Windows mobile devices.
|
Allow Internet sharing from the device
|
You can prohibit your mobile device users from using the Internet sharing feature included with Windows mobile 6.0 devices. The Internet sharing feature makes it possible to connect your laptop to Internet using your mobile device.
|
Allow remote desktop from the device
|
Prohibit your mobile device users from using the remote desktop feature, which is included with most Windows mobile devices. With remote desktop you can connect remotely to a Windows XP/Vista client or an Windows 2003/2008 server.
|
Allow synchronization from a desktop
|
Allow or prohibit your mobile device users from using the Desktop ActiveSync client to synchronize a mobile device. If prohibited the mobile device users can only issue a sync over the air.
|
Allow Bluetooth
|
Allow or prohibit your mobile device users from using a Bluetooth connection. You can also specify if the users should only be able to use Bluetooth for hands free.
|
Table 3: Exchange ActiveSync Policy Configuration Settings
Note:
All settings on the Device tab are premium features, which means that you must have Exchange Enterprise CALs in order to use them.
All settings on the Device tab are premium features, which means that you must have Exchange Enterprise CALs in order to use them.
Moving on to the last tab, which is the Advanced tab. As can be seen in Figure 8, we can specify whether mobile device users should be allowed to use the Internet browser, consumer mail, unsigned applications, and install unsigned installation packages. In addition it is possible to allow or block specific applications.

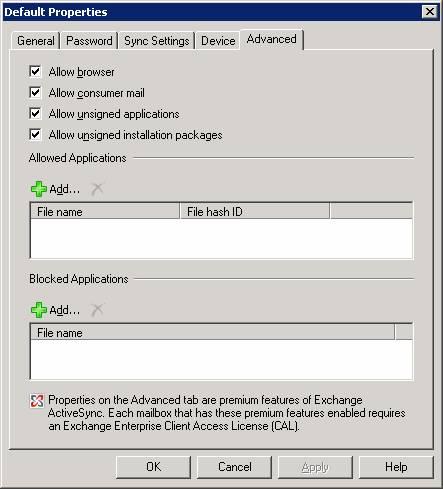
Figure 8: Advanced tab on the Default Exchange ActiveSync Property Page
The Advanced tab is also new and I have listed each policy settings on this tab with a short description in Table 4 below.
Exchange ActiveSync Policy Setting
|
Description
|
Allow browser
|
Allow or prohibit users from using the browser on their mobile device.
|
Allow consumer mail
|
Allow or prohibit users from receiving consumer email on their mobile device.
|
Allow unsigned applications
|
With this setting enabled, mobile device users are allowed to run applications that have not been signed with a trusted certificate.
|
Allow unsigned installation packages
|
With this setting enabled, mobile device users are allowed to install applications that have not been signed with a trusted certificate.
|
Table 4: Exchange ActiveSync Policy Configuration Settings
In addition to the policy settings in Table 4, you can enter in the Allowed and Blocked Applications boxes any applications that should be specifically allowed or blocked.
Note:
All settings on the Advanced tab are premium features, which mean that you must have Exchange Enterprise CALs in order to use them.
All settings on the Advanced tab are premium features, which mean that you must have Exchange Enterprise CALs in order to use them.
Those of you who paid close attention to Table 1 would have noticed that not all the new policy settings in Exchange Server 2007 SP1 have been exposed in the EMC GUI. The following policies must be manipulated via the Exchange Management Shell:
- AllowTextMessaging
- AllowPOPIMAPEmail
- RequireSignedSMIMEMessages
- RequireEncryptedSMIMEMessages
- AllowSMIMESoftCerts
- RequireSignedSMIMEAlgorithm
- RequireEncryptionSMIMEAlgorithm
- AllowSMIMEEncryptionAlgorithmNegotiation
- MaxEmailBodyTruncationSize
- MaxEmailHTMLBodyTruncationSize
- UnapprovedInROMApplicationList
- ExternallyDeviceManaged
- MailboxPolicyFlags
Time will tell whether any of these will be included in the GUI in the RTM version of Exchange Server 2007 SP1.
Remote Wipe Confirmation
In addition to a new default EAS policy and the introduction of several new policy settings, Exchange Server 2007 SP1 also includes enhancements related to the remote wipe feature, which is used to remotely reset a mobile device back to factory defaults in case it is lost or stolen. Since this feature works well, not much has changed, but now a confirmation e-mail message is sent to the user’s mailbox once the mobile device has been remotely wiped successfully. This happens even if the wipe has been initiated by an Exchange administrator through either the Exchange Management Console or the Exchange Management Shell as well as if a user initiates the wipe via the Mobile Devices page under Options in Outlook Web Access 2007 (Figure 9).


Figure 9: Successful Remote Device Wipe via OWA 2007
When the mobile device has been wiped successfully, an e-mail confirmation similar to the one shown in Figure 10 is sent to the respective user’s Inbox.
 Figure 10: Remote Device Wipe Confirmation E-Mail

In addition, you now have the option of cancelling a remote wipe both from OWA 2007 and the Exchange Management Console/Shell.
S/MIME Supported again
As some of you probably are aware, the S/MIME components for OWA 2007 and EAS didn’t make it into the Exchange 2007 RTM version. Well now they’re back! This means you once again are able to digitally sign as well as encrypt E-mail messages right from your mobile device. As you saw in the tables previously in this article, you can control S/MIME on mobile devices via several S/MIME specific policies.
Direct Push Protocol Data Reduction
The Exchange product group Front End team has also improved the Direct Push protocol, which is the protocol used by Exchange ActiveSync. The team has managed to reduce the size of the HTTPS request and response headers even further, which reduces the overall amount of data sent between the devices and the Client Access server(s). Although this enhancement is well hidden from device users, it is actually a rather important enhancement as it means that Enterprise organizations, where most end-users synchronize a mobile device with their mailbox will be able to lower the expenses used for over the air data.
Outlook Anywhere 2007 with ISA Server 2006
| |
Let’s begin
Beginning with Exchange Server 2003 and Outlook 2003, users can use their Outlook with full functionality over the Internet. Outlook 2003 is a full MAPI Client which uses RPC to communicate with the Exchange Server. This is definitely not Firewall friendly so Microsoft developed a technology called RPC over HTTPS. Using RPC over HTTPS, RPC packets will be tunnelled through HTTPS so you only need to open the HTTPS Port on the Firewall.
Exchange 2007 has changed the name from RPC over HTTPS to Outlook Anywhere but the technique is the same.
On Exchange Server site
First, the RPC over HTTPS Proxy component must be installed on the Exchange Server.

Figure 1: Install the RPC over HTTPS Proxy
Open the Exchange Management Console and enable Outlook Anywhere under the Client Access role in the Server Configuration container.

Figure 2: Enable Outlook Anywhere
Select the External authentication methods. For this example we select Basic Authentication.
Please note:If you are using ISA Server 2006 as the Firewall it is possible to select NTLM authentication, so the password prompt, if users open Outlook 2007, is gone (this is also possible with Outlook 2003 and Exchange Server 2003).

Figure 3: Select Authentication method
On IIS Site
The installation of the RPC over HTTPS proxy components creates a new Virtual Directory in IIS called RPC. You must enable SSL for this Directory and activate Integrated Windows Authentication or Basic Authentication depending on the Authentication selection in Exchange Server 2007.

Figure 4: Enable SSL and Authentication
Split DNS or HOSTS file?
The Public Name RPC.IT-TRAININGR-GROTE.DE in the RPC Web listener must be resolvable to the internal Exchange Server IP Address, so you have two options:
- Split-DNS or
- HOSTS file
If you are using Split DNS you must create a new Forward Lookup zone in DNS named IT-TRAINING-GROTE.DE. Second you must create a new A-record named RPC in the new Forward Lookup zone with the IP Address of the internal Exchange Server.
If you are using the HOSTS file you only need to extend the file with an entry like this:
IP address of the Exchange Server RPC.IT-TRAINING-GROTE.DE

Figure 5: Modify HOSTS file
The next step is to request a certificate for the RPC Listener on ISA Server because we are using HTTPS-Bridging. ISA Server terminates the SSL connection from the Outlook 2007 client, inspects the traffic and encrypts the connection to the Exchange Server again. The common name (CN) of the requested certificate must match the Name of the Server that Outlook 2007 clients use in the Outlook profile. In this example the Public FQDN is RPC.IT-TRAINING-GROTE.DE so the CN of the certificate must be RPC.IT-TRAINING-GROTE.DE. You can request certificates via the CA servers webconsole (http://caservername/certsrv). You must request a Webserver certificate as shown in the following figure.
Please note:Depending on your ISA Server Firewall rules, you must create a Firewall rule that allows HTTP or HTPS access from your ISA Server to the CA Server.

Figure 6: Request a certificate for ISA
Now it is time to create the Exchange Webclient Access Publishing rule.
Start the ISA MMC click - New - Exchange Webclient Access Publishing Rule. Name the rule and select the Exchange Version and that you want to publish Outlook Anywhere.

Figure 7: Select Outlook Anywhere
Select Publish a Single Website or load balancer
In the next window of the Wizard select the option Use SSL to connect to the published Web server or server farm.
Enter the Name of the Internal Site Name. You can specify a NetBIOS servername or DNS FQDN.
Next you must enter the Public Name that RPC over HTTPS users with Outlook 2007 must use when they want to access the Exchange Server with Outlook 2007 from the Internet. You can see the configuration in the next figure.

Figure 8: Enter the Public name
New Web listener
The next step in the wizard is to create a Web listener. ISA Server uses Web listeners to listen for incoming requests that match the Listeners' settings. A Web listener is a combination of an IP address, a Port and, when you use SSL, a certificate. You must give the Web listener a unique name.
In the next window of the Wizard select Require SSL secured connections with clients.
You must specify the Web Listener IP Address. If the request comes from the Internet you must select the External Network. If your ISA Server has more than one IP Address bound to the External Network Interface you can select the IP Address used for Outlook Web Access.

Figure 9: Select the Network Listener
Select the Certificate that you had requested from the internal CA server and click Next.

Figure 10: Select a certificate
Select HTTP Authentication from the dropdown field and select Basic as the Authentication method.

Figure 11: Specify Authentication settings
In the Authentication Delegation dialogue box select Basic Authentication.

Figure 12: Select Authentication Delegation
The last step in the Wizard is to specify the user group for which the Firewall rule applies to. The default setting is “All Authenticated Users”.
Finish the Wizard and Click Apply to save the settings.
After creating the RPC rule you should change some settings:
- Change “Requests appears to come from the original Client” in the “To” Tab
- Enable “Require 128 Bit encryption for HTTPS Traffic” in the “Traffic” Tab
Test the Client Connection
After successfully configuring Exchange Server 2007 and the RPC Publishing rule you can test the connection from one of your clients. For this article the client is a Windows XP Service Pack 2 machine with Office 2007 Beta 2 installed.
You must create a new e-mail profile for the user. After creating the profile you must configure Outlook Anywhere by activating Connect to my Exchange Mailbox using HTTP.

Figure 13: Activating Outlook Anywhere in Outlook 2007
The public name is rpc.it-training-grote.de, the Proxy authentication setting is Basic Authentication.

Figure 14: Configuring Outlook Anywhere in Outlook 2007
After the Mail profile is configured you should be successfully logged on to the Exchange Server.

Figure 15: Outlook 2007 connection with HTTPS
No comments:
Post a Comment