Difference between exchange server 2003 and exchange server 2007
1.Protection: anti-spam, antivirus, compliance, clustering with data replication, improved security and encryption
2.Improved Information Worker Access: improved calendaring, unified messaging, improved mobility, improved web access
3.Improved IT Experience: 64-bit performance & scalability, command-line shell & simplified GUI, improved deployment, role separation, simplified routing
4.Exchange Management Shell: a new command-line shell and scripting language for system administration (based on Windows PowerShell). Shell users can perform every task that can be performed in the Exchange Server graphical user interface plus additional tasks, and can program often-used or complex tasks into scripts that can be saved, shared, and re-used. The Exchange Management Shell has over 375 unique commands to manage features of Microsoft Exchange Server 2007.
5."Unified Messaging" that lets users receive voice mail, e-mail, and faxes in their mailboxes, and lets them access their mailboxes from cell phones and other wireless devices. Voice commands can be given to control and listen to e-mail over the phone (and also send some basic messages, like "I'll be late")
6.Removed the database maximum size limit. Database size is now limited by hardware capability and the window for backups and maintenance.
7.Increased the maximum number of storage groups and mail databases per server, to 5 each for Standard Edition (from 1 each in Exchange Server 2003 Standard), and to 50 each for Enterprise Edition (from 4 groups and 20 databases in Exchange Server 2003 Enterprise).
How the Exchange Server 2007 Core Services Work Together
The following picture shows the Exchange Server 2007 core services, but there are more Exchange related services like:
- WWW Publishing Service
- RPC (Remote Procedure Call)
- Windows Management Instrumentarium ...
and many more.

Figure 1: Exchange core services
Service dependencies
Many Exchange 2007 services have dependencies on other Exchange and Windows services. You can see the dependencies in the properties of the specific service or in the Registry under:
HKEY_LOCAL_MACHINESystemCurrentControlSet\Services\Servicename
The following picture shows the dependencies of the Microsoft Exchange Active Directory Topology service, one of the Exchange Server core services.

Figure 2: Exchange Service Dependencies
Microsoft Exchange Active Directory Topology service (MSExchangeADTopology)
The Microsoft Exchange Active Directory Topology service and provides Active Directory topology information to several Exchange Server components. This service uses DSACCES to provide faster access to Active Directory information.
Microsoft Exchange Information Store (MSExchangeIS)
The Microsoft Exchange information Store service is responsible for handling the Exchange database and providing access for messaging clients like Outlook 200x. The Microsoft Exchange Information Store service has no dependencies on other Exchange services.
Microsoft Exchange Mail Submission Service (MSExchangeMailSubmission)
The Microsoft Exchange Mail Submission Service is responsible for the communication between the Exchange Server with the Hub Transport Server role and the Mailbox Server role. This service informs the Hub Transport Server when new messages are in the Outlook clients’ Outbox. The Hub Transport Server picks up this message and is responsible for relaying and other tasks (Transport rules, Message Records Management etc.). The Microsoft Exchange Mail Submission Service depends on the Microsoft Exchange Active Directory Topology service.
Microsoft Exchange Replication Service (MSExchangeRepl)
The Microsoft Exchange Replication Service provides log shipping functionality for Local Continuous Replication (LCR) or Cluster Continuous Replication (CCR) when one of these new technologies in Exchange Server 2007 is activated. The service depends on the Microsoft Exchange Active Directory Topology service.
Microsoft Exchange Transport (MSExchangeTransport)
The Microsoft Exchange Transport service is the new SMTP service in Exchange Server 2007 which does not depend on the underlying Windows Server / IIS technology. The service depends on the Microsoft Exchange Active Directory Topology service.
Microsoft Exchange Transport Log Search (MSExchangeTransportLogSearch)
The Microsoft Exchange Transport Log Search allows administrators to query Message Tracking logs and Transport logs. It also provides support for Transport Pipeline tracing. The service has no dependencies.
Web Services and Exchange 2003
Exchange Server 2007 uses some parts of the Windows Server 2003 Internet Information Services (IIS) infrastructure for Exchange services like Outlook Web Access (OWA) and services like POP3 and IMAP4. Exchange Server 2007 is the first Exchange Server which has no dependencies on IIS 6.0 for the Windows built in SMTP service. Exchange Server 2007 uses its own SMTP stack.
Because Exchange Server 2007 does not provide OMA (Outlook Mobile Access) support, there is no OMA Application pool in IIS and the only Exchange Application pool in Exchange Server 2003 has been divided into five Application Pools in Exchange Server 2007:
- MSExchangeAutodiscoveryAppPool
- MSExchangeOWAAppPool
- MSExchangeServicesAppPool
- MSExchangeSyncApp
- MSExchangeUMAppPool
As you can see in Figure 3 Exchange uses some IIS Application pools and messaging services like IMAPSVC under the control of INETINFO.EXE. HTTP.SYS is the IIS core component which controls a lot of related IIS components.
Note:Exchange Server 2007 does not need an installed Windows NNTP service. You must uninstall the NNTP service before installing Exchange Server 2007.
EXIFS – not used in Exchange Server 2007
Exchange Server 2007 does not support ExIFS, the Exchange Installable File System, because it is no longer necessary. The Microsoft Exchange Information Store (MSExchangeIS) only uses EDB format databases. The streaming media format (.STM file extension) has gone in Exchange Server 2007. It is no longer possible to mount the Exchange Information Store with this virtual file system driver (\\.\BackofficeStorage in Exchange Server 2003 and 2000).
System Attendant – no longer as powerful in Exchange Server 2007
The Microsoft Exchange Server System Attendant is no longer the most powerful service. The Microsoft Exchange SA provides monitoring, maintenance, and directory lookup services for Exchange Server 2007. This service depends upon the following services: Event Log, NTLM Security Support Provider, Remote Procedure Call (RPC), Server, and Workstation but no Exchange Server service depends on the MSEchangeSA service. MSExchangeSA is responsible for:
- DSAccess (DSAccess.dll) – Provides Exchange Active Directory Access
- DSProxy (DSProxy.dll) – Provides Directory Service Lookup for older Outlook clients
- Server Monitor Component - Monitoring server resources
- Mailbox Manager Component - Managing mailboxes
- Metabase update service - Replicating settings from Active Directory to the IIS metabase
- System Attendant Component - Verifies computer account configuration
DSProxy
DSProxy provides both proxy and referral services. Outlook clients running Outlook 2002 Service Release 1 and earlier versions use the DSProxy functionality because these clients were programmed to use Exchange Server as its directory service like in Exchange Server 4.0 to 5.5. DSProxy emulates a directory service, so that earlier clients can use the functionality. Exchange Server 2007 server forwards the requests to Active Directory.
- Emulate a MAPI address book service
- Proxy requests to an Active Directory server
DSProxy provides both proxy and referral services. Outlook clients running Outlook 2002 Service Release 1 and earlier versions use the DSProxy functionality because these clients were programmed to use Exchange Server as its directory service like in Exchange Server 4.0 to 5.5. DSProxy emulates a directory service, so that earlier clients can use the whole functionality. Exchange Server 2007 server forwards the requests to Active Directory.
Later versions of Outlook, beginning with Outlook 2000 with SR-2 and Outlook 2002/2003, are designed with the assumption that Exchange Server 2003/7 does not have its own directory service. After DSProxy has relayed one of these Outlook clients to a global catalog (GC) server, the client communicates directly with Active Directory.
DSAccess
Several Exchange 2007 services access information that is stored in Active Directory and write information to the Active Directory. If this communication occurred directly between each service and Active Directory, Exchange 2007 could overload a global catalog server with communication requests. DSAccess is the component which controls the interaction between Exchange requests and the Active Directory. DSAccess provides its own cache (DSAccess cache) for faster information retrieval.
DSACCESS is used by the following Exchange services:
- Microsoft Exchange Active Directory Topology (MSExchangeADTopology)
- Microsoft Exchange Information Store (MSExchangeIS)
- Microsoft Exchange System Attendant (MSExchangeSA)
- World Wide Web Publishing Service (W3SVC)
DSAccess discovers the Active Directory topology, detects domain controllers and Global Catalog servers, and maintains a list of valid directory servers that are suitable for use by Exchange components. In addition, DSAccess maintains a cache that is used to minimize the load on Active Directory by reducing the number of Lightweight Directory Access Protocol (LDAP) requests that individual components send to Active Directory servers. The DSAccess Cache is configurable through several Registry Keys.
Changes in Exchange Server 2007
One of the biggest changes to DSAccess in Exchange Server 2007 is the Active Directory driver when compared to DSAccess. The Active Directory Driver does not access and store directory information in its cache. The Exchange component which is using DSAccess at the moment is responsible for implementing the cache when it is needed.
RUS – Recipient Update Service – not used in Exchange Server 2007
The Recipient Update Service (RUS) used by Exchange Server 2003 for the provisioning of new and existing Exchange objects like mail enabled users, mailbox users and contacts is an asynchronous task which stamps Exchange objects with e-mail addresses based on Exchange recipient policies. Exchange Server 2007 does not use the RUS. In Exchange 2007, recipients are fully provisioned when they are created in the Exchange Management Console (EMC) or in the Exchange Management Shell (EMS), so the asynchronous RUS service used in Exchange Server 2003 is gone. The RUS API (Application Programming Interface) used to calculate new Exchange objects still exists in Exchange 2007 and is now used directly by Exchange Management Shell cmdlets or the GUI to provision these objects..
DS2MB – Directory Service to Metabase
The function of DS2MB is to replicate configuration information from Active Directory to the local IIS metabase.
DS2MB is implemented as a process in DS2MB.dll and the primary function is to synchronize Exchange configuration settings in Active Directory with settings in the IIS metabase. The DS2MB is an unidirectional process which replicates information only from the Active Directory to the IIS metabase. You can view and edit the IIS metabase with the Metabase Explorer from the IIS 6 Resource Kit.
Microsoft Exchange MTA Stacks service (EMSMTA.exe) – not used in Exchange Server 2007
The Microsoft Exchange MTA Stacks service (MTA) in Exchange Server 2003 routes messages through X.400 and gateway connectors to non-Exchange messaging systems. In a mixed Exchange Server environment with servers running Exchange Server 5.5 in the local Exchange routing group, the MTA is also used to transfer messages between Exchange Server 2003 and Exchange Server 5.5. This occurs because Exchange Server 5.5 MTAs communicate with each other in the local site directly through RPCs. Exchange Server 2003 must rely on this communication method for backward compatibility.
Exchange Server 2007 does not use the MTA object and the X.400 connector (which must use the MTA) is gone in Exchange Server 2007. There are no longer any X.400 default proxy e-mail addresses in Exchange Server 2007.
Routing Engine (RESvc.dll) – not used in Exchange Server 2007
The Exchange Routing Engine service provides topology and routing information to servers running Exchange Server 2003. Exchange Server 2007 does not use the routing engine (RESVC.DLL) component. SMTP routing is handled by the Microsoft Exchange Transport engine (MSExchangeTransport).
IIS Admin service
The IIS Admin service (IIS Admin) manages the IIS Metabase and updates the registry for the following services:
- WWW service
- FTP service
- SMTP service (not required and supported in Exchange Server 2007)
- POP3 service
- IMAP4 service
- NNTP service
The IIS Admin service also provides access for other applications to the IIS configuration information, such as to the metabase update service, which is an internal component of the system attendant.
The registry key for the IIS Admin service is HKEY_LOCAL_MACHINE\SYSTEM\CurrentControlSet\Services\IISAdmin.
Note:Exchange Server 2007 does not depend on the IIS 6.0 SMTP service. Exchange Server 2007 uses its own SMTP stack implemented in the Microsoft Exchange Transport service.
Exchange Server 2007 Email Routing, Part 1 – Theoretical Basics
To work with Exchange Server and troubleshoot message transport problems you should know the internal workings of Exchange message routing.
Messaging Components are:
- Submission Queue
- Store Driver
- Microsoft Exchange Mail Submission Service
- Pickup Directory
- Categorizer
Messages from outside your Exchange organization enter the transport pipeline through an SMTP Receive Connector. Messages inside enter the pipeline through the Hub Transport server role.
Submission Queue
Each Transport server role (Hub or Edge Transport) has one submission queue that is created by the categorizer when Exchange Transport Service starts. It stores all messages on the local hard disk until they are processed by the categorizer for delivery. They are then finally removed from this queue.
Store Driver
Messages sent by a mailbox user enter the transport pipeline when they reach the sender’s outbox. The store driver on the Hub Transport retrieves it from the user’s Outbox and then transfers it to the submission queue. After the message has been successfully added to the submission queue, it is moved from the sender’s Outbox to the sender’s Sent Items. Messages are stored in MAPI format and must be converted to Summary Transport Neutral Encapsulation Format (S/TNEF) before being placed in the Submission Queue. This conversion is the job of the store driver, too. If this conversion is unsuccessful, a non-delivery report (NDR) is generated.
Microsoft Exchange Mail Submission Service
The Microsoft Exchange Mail Submission Service is a notification service that runs on Mailbox server roles. It notifies the Hub Transport server role to pick up the message from the sender’s Outbox. If there are multiple Hub Transport server roles on one Active Directory site, the Message Exchange Mail Submission service attempts to evenly distribute notifications between each transport role using static load balancing.
Pickup Directory
Each message that is transferred to the pickup directory has been successfully submitted to the submission queue via the categorizer. Messages placed in the Pickup Directory must be in the appropriate format and have read/write permissions configured. It allows you to take a properly formatted text file and have the Hub Transport server role process and deliver it. This can be very helpful when mail flow is being validated in the organization or relaying specific messages or returning to the transport pipeline. Even 3rd party applications may place messages in the Pickup directory rather than communicating directly with the Exchange Server.
Categorizer
The categorizer always picks the oldest message from the Submission queue and checks whether this message has to be routed internally in the Exchange organization or externally.
On each Hub Transport server the categorizer performs the following tasks:
- Identification and verification of recipients
- Expansion of distribution lists
- Determination of routing paths
- Conversion of content formats
- Application of message policies
What is a Recovery Storage Group?
A Recovery Storage Group is an Exchange Server 2007 feature that allows the administrator to create an “invisible” storage group that can be used to restore a mailbox database and extract data from it without affecting the production database that is being accessed by end users.
The Recovery Storage Group is only used for restore and recovery operations. It is never connected to by an end user using Outlook or other mail protocols, and the mailboxes contained within it are not associated with any Active Directory user accounts.
Restoring Mailbox Items using the Recovery Storage Group
In this example the user “John Smith” has deleted an email from the inbox that was received last week. The Mailbox server is backed up every night and so the email administrator knows that the item is likely contained within one of the previous nights’ backups.To begin the recovery process launch Database Recovery Management from the Toolbox of the Exchange Management Console.


Fill out the activity name, server name, and domain controller name and click Next to continue.


From the list of tasks choose “Create a recovery storage group”.
Link the Recovery Storage Group to the same storage group as the mailbox you intend to recover data from, and click Next to continue.


Give the Recovery Storage Group a name (the default name is fine) and modify the other settings if you wish. The Recovery Storage Group does not need to be located on the same drive as the storage group or mailbox database you are recovering, but once it is created it cannot be moved so make sure you choose a location with enough free disk space to hold a copy of the mailbox database.


When this has completed go back to the task center and click on “Set up ‘Database can be overwritten by restore’ flag”. Choose the mailbox database for the Recovery Storage Group and complete the task.
Now that the Recovery Storage Group has been created a restore operation from the Windows Server 2003 backup utility will recover data to the Recovery Storage Group rather than to the production database.
Once the restore has been performed click on “Mount or dismount databases in the recovery storage group”. Select the mailbox database and click on “Mount selected database”.


Return to the task center. Now we can begin to extract mailbox data from the Recovery Storage Group. Click on “Merge or copy mailbox contents”. The mounted database within the Recovery Storage Group will be selected. Click on “Gather merge information”.
Click on “Show Advanced Options” and set the start data and finish date to the date range that you wish to recover mailbox items from.


Click on “Perform pre-merge tasks”. A list of available mailboxes will be displayed. Make sure you have only selected the mailbox that you wish to recover items for, then click on “Perform merge actions”.


When the merge has completed the items will be visible in the end user’s mailbox without them needing to restart Outlook.
After the mailbox item recovery is complete we need to remove the Recovery Storage Group from the server. In the task center click on “Mount or dismount databases in the recovery storage group” and dismount the recovery mailbox database. Return to the task center once more, click on “Remove the recovery storage group” and follow the steps to complete the task.
Exchange Database Recovery – Using eseutil commands
The real job of an exchange administrator is to maintain high availability when it comes to a messaging environment.
Below mentioned processes are not done on a day to day basis, but understanding how the process works is mandatory for every exchange administrator.
A step by step walk-through of procedure to be followed when exchange database fail to mount in Exchange System Manager:
1. Perform the Eseutil /mh “Path of the database” as indicated below and check the state of the database.


Health of the Database
2. If the state is in clean shutdown, move all the log files from the Transaction logs folder location and then mount the stores.
3. If the state is in Dirty shutdown as mentioned below, check if the log files that is indicated as Logs required is available or not.


Database in Dirty Shutdown
5. To make sure that the log files that is required is in a Clean state, you can perform Eseutil /ml “Path of the log files\log prefix” as indicated below. This command will help you check the health of all the log files in the location.


log file health - eseutil /ml
6.If the log files are healthy, then perform the Soft recovery with the command Eseutil /r <Log Prefix> /l “Path of the log files” /d “Path of the database”


Soft recovery - eseutil/r
7. Once the command completes successfully, mount the stores.
You might get this error:
“Operation terminated with error -1216 (JET_errAttachedDatabaseMismatch, An outstanding database attachment has been detected at the start or end of recovery, but database is missing or does not match attachment info) after n seconds.”
To resolve this, run soft recovery with the “/i ” switch at the end and it will override the EDB-STM mismatch.
How to run HARD RECOVERY:
In case the required log files are not available in a clean state or missing, either restore from a successful back up or perform Hard repair.
8. In case we have valid backup, then we can restore the files.
9. In any restoration software, once the restoration completes, it should create a location containing the restore.env file along with the logs that were backed up without being committed to the database that was backed up.
10. By default, we have the location as C:\Temp as indicated below:


Log restore location
11. This folder contains the restore.env along with the logs as indicated below:


Restore.env Location
12. Make sure we take a copy of the folder containing the logs and restore.env file as the content of the folder will be lost if the hard recovery completes or fails.


Copy the folder post restore
13. In the command prompt, perform the Hard recovery from the BIN folder with the following command:
Eseutil /cc “Path of the restore.env containing folder”

Hard Recovery - eseutil /cc
14. The command will complete successfully:


Hard Recovery completion
15. If you check the folder that contained the restore.env file, we would find that to be empty:


Location becomes empty post Hard Recovery
16. If the backup was taken a few days back and there were logs created in the production location once the backup was done, then we must make sure that the production location contains the sequence of logs from the one in the restore.env location. In this case, the restore.env folder contained the last log file as E0000003.log. If the production location does not contain a sequence of this (i.e. E0000004.log), the hard recovery command will fail.
17. We can use the eseutil /cc “Path of the restore.env folder” /t in order to avoid playing the logs in the production location. (Kindly make sure to take a copy of the folder once again before performing the command as mentioned in step 12. However, in this case, there will be data loss of the mails created after the backup was taken.
18. We can mount the stores successfully.
How to run HARD REPAIR:
19. We can Hard repair the databases, to get them back into a clean shut down state in case we do not have a valid back up. To do so type the command:
D:\Program Files\Exchsrvr\Bin>eseutil /p “D:\Exchsrvr\Mailbox Store (SERVER).edb”
20. When you are prompted to confirm this operation, choose OK.


Pop-up whilst repair
21. The process completes successfully.


Repair process completed
How to run OFFLINE DEFRAG:
22. Once Eseutil /p finishes we will need to defrag the databases, to do so type the following command: Note: You must have available hard disk space equal to 110 percent of the size of the database that you want to defragment.
23. To defragment Priv.edb, type the following command at the command prompt, and then press ENTER:
24. D:\Program Files\Exchsrvr\Bin>eseutil /d “D:\Exchsrvr\Mailbox Store (SERVER).edb”


Offline Defrag
25. Note If the private and the public information store databases are large, this step may take some time. When you are prompted to confirm this operation, choose OK.
XADM: How to Defragment with the Eseutil Utility (Eseutil.exe) http://support.microsoft.com/?id=192185
26. Once Eseutil /d finishes Mount the store & Dismount the store immediately then perform the below steps.
How to run ISINTEG:
27. Use Isinteg.exe to fix the Pub1.edb database and the Priv1.edb database. The Isinteg.exe utility runs a test on all areas of each of the databases and reports the results. Isinteg.exe also tries to fix any issues that are encountered.
28. To fix Priv1.edb, type the following command at a command prompt
29. E:\Program Files\Exchsrvr\Bin>isinteg -s (SERVER) -fix -test alltests and choose the store that we are running the command on.

ISINTEG
You are prompted to select the database to be checked.
Index Status Database-Name
Storage Group Name: First Storage Group
1 Offline Mailbox Store (servername)
2 Offline Public Folder Store (servername)
30. Enter a number to select a database or press Return to exit.
31. You can only check databases that are marked as offline. The Information Store service must be started, but the information store must be dismounted.
32. When you select a database, you are prompted with the following message to confirm the selection:
“You have selected First Storage Group / Mailbox Store <servername>
Continue? (Y/N)”
33. Press Y and Enter to start checking the selected database.
34. You receive a summary report that indicates the number of tests that were run, the number of warnings, the number of errors found, the number of fixes attempted, and the time it took for the program to run. If there are any warnings, errors, or fixes, run the command again. Repeat this step until there are no warnings, errors, or fixes reported and the report looks similar to the following text:
Test reference table construction result:
0 error(s); 0 warning(s); 0 fix (es); 0 row(s); time: 0h: 0m: 0s
Test Folder Result:
0 error(s); 0 warning(s); 0 fix (es); 101 row(s); time: 0h: 0m: 0s
Now in test 3 (reference count verification) of total 3 tests;
100% complete.


ISINTEG Completion
Before you execute any command on the database, please make sure that QUICKEDITMODE is not checked in command prompt properties as it may pause the process upon left click.
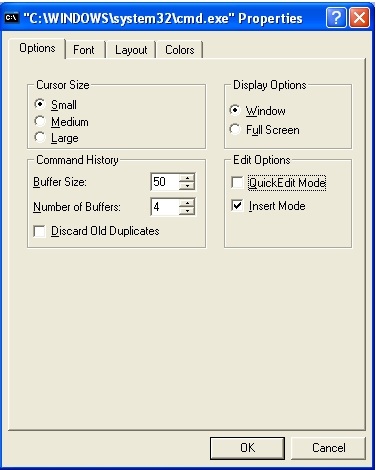
Quickeditmode disabled
Managing Exchange Certificates
Certificates can be used to encrypt the communication flow between two endpoints (both clients and servers). Certificates can also be used by these endpoints to authenticate themselves from each other. Exchange 2007 uses X.509 certificates for authentication and for encryption. X.509 certificates follow a standard format as published by the Telecommunication Standardization Sector (ITU-T).
An X.509 certificate is issued by a Certificate Authority (CA) that will bind the public key to a designated Distinguished Name, formatted according to the X.500 tradition, or to a so-called Subject Alternative Name or any of the Subject Alternative Names.
There are several components in Exchange 2007 that rely on certificates for encryption, authentication or both. In this article I will provide you with an overview of the different Exchange components that use certificates. I will then go deeper into the features of the by-default generated self-signed certificate. In part 2 of this article I will cover the naming requirements of a certificate you need to keep in mind when getting your certificates. To end, in part 3 of this article I will take a closer look at the different Exchange Management Shell cmdlets that are available to create, manage, and remove Exchange certificates.
Certificate Usage by Exchange Server 2007 Components
As already stated, several Exchange Server 2007 components rely on X.509 certificates for encryption, authentication or both. You will notice that when you install the Exchange 2007 Hub Transport server role, Client Access server role, Unified Messaging server role, and Edge Transport server role, Exchange will create by default a self-signed certificate to make sure its required components can use that certificate to function as required.
Figure 1 below shows you the self-signed certificate that is created by Exchange during the installation of the Exchange 2007 Client Access, Hub, and Unified Messaging server role. This certificate will be used by the following services: IIS, SMTP, POP, IMAP, and UM.


Figure 1: Self Signed Certificate created by default when installing the Exchange 2007 HUB, CAS, UM server role
Hub/Edge Transport server role and certificates
Transport Layer Security between Active Directory sites
The Exchange 2007 Hub Transport server role uses a certificate to encrypt all SMTP traffic between Active Directory sites. It is not possible to configure Exchange to allow unencrypted SMTP traffic between Hub Transport servers, located in different sites.
In order to see which certificate is used between two Hub Transport servers located in different Active Directory sites, you can enable SMTP protocol logging on the intra-organization Send connector on every Hub Transport server, as you can see in figure 2 below, by using the Exchange Management Shell cmdlet Set-Transport Server.


Figure 2: Setting IntraOrgConnectorProtocolLogging to verbose
By setting the so-called IntraOrgConnectorProtocolLoggingLevel to verbose, protocol logging will be added to the Send connector protocol log. After sending a mail from a mailbox homed in Site B to a mailbox located on an Exchange 2007 Mailbox server in Site A, looking at the Send protocol log reveals that the Exchange Hub Transport server in Site B (Ex2007SE) uses the certificate offered by the Exchange Hub Transport server in the destination Active Directory site (Ex2007EE) to start Transport Layer Security, as can be seen in Figure 3.


Figure 3: Send Protocol Log between Active Directory Sites
A quick look at the certificate on the Hub Transport server available for TLS, shows that it is a self-signed certificate used (Figure 4).


Figure 4: Self Signed Certificate
EdgeSync
Once EdgeSync is configured between your internal Hub Transport servers and the Edge Transport server(s), both servers will use a certificate to encrypt their communication. In addition both certificates will be used as a means to provide direct trust. Direct trust is a method of authentication where a certificate can be used for authentication when the provided certificate is present in Active Directory (for the Hub Transport server role) or ADAM/LDS (for the Edge Transport server role). When setting up EdgeSync, the requested certificates are published in the correct location.
Opportunistic Transport Layer Security
Whenever a SMTP server opens a connection to the Exchange 2007 Hub/Edge Transport server role, Exchange will allow for opportunistic TLS, by offering its certificate.
Domain Security
Certificates can also be used by the Hub/Edge Transport server to configure Domain Security with partner organizations, both for encryption and authentication.
Client Access Server role and certificates
Client Access
Certificates are used by the Client Access server role to allow the communication flow to be encrypted between the Client Access server and its different clients. By default SSL is required for:
Outlook Web Access
Outlook Anywhere
Exchange ActiveSync
POP3
IMAP4
Exchange Web Services as Autodiscover, EWS, and Unified Messaging
 Figure 5: Require SSL

The only virtual directory for which the use of a certificate is not required by default is the one that makes the Offline Address Book available for download by Microsoft Office Outlook 2007 clients and later.


Figure 6: OAB Virtual Directory does not require SSL by default
Certificate Based Authentication
It is possible to configure certificate based authentication, thereby allowing clients to authenticate themselves against the Client Access server by using their personal certificate.
Unified Messaging Server Role and Certificates
Certificates are used by the Unified Messaging Server role to encrypt the communication when sending a recorded Voice Mail message to the Exchange Hub Transport Server role. Certificates can also be used to encrypt the SIP and/or RTP traffic to the UM IP Gateway, and have to be used when you decide to deploy Office Communications Server in your environment, since Office Communications Server only communicates with other server roles through encryption.
What is all this about the Self-Signed Certificate?
When you deploy any Exchange 2007 Server role, except for the Mailbox Server role, Exchange will generate a self-signed certificate, and allow Exchange to use this certificate when required for the services IIS, SMTP, POP3, IMAP4, and UM.
Characteristics of this Self-Signed Exchange Certificate
Let us have a look at some of the features of this by default generated Self-Signed certificate.
Self-Signed certificates are only valid for one year
Self-Signed certificates are valid for one year, as can be seen in Figure 7, and will need to be renewed after a year.


Figure 7: Self-Signed Certificate only valid for one year
To renew a Self-Signed certificate, you can use the Exchange Management Shell cmdlet New-ExchangeCertificate. If you first grab the existing certificate by running Get-ExchangeCertificate, you can pipe the object to the cmdlet New-ExchangeCertificate, which will generate a new Self-Signed Certificate with the same settings, and enable it for the same services by default.
In Figure 8 you can see how the existing Self-Signed Certificate is renewed.


Figure 8: Renew an existing Self-Signed Certificate
The Exchange 2007 Client Access server only allows one certificate to be enabled for usage with IIS, but you can have multiple certificates enabled for POP, IMAP, UM, and SMTP. When multiple certificates are available, Exchange will select a certificate based on different criteria. I will come back this certificate selection process in part 2 of this article.
Self-Signed Certificate has by default one Common Name and two Subject Alternative Names
The Self-Signed certificate that is created when deploying Exchange 2007 will have its common name set to the Host name of the Exchange server, and have two Subject Alternative Names set to its Host name and its Fully Qualified Domain Name.


Figure 9: Self-Signed Certificate and its Subject and CertificateDomains
It is possible however to generate a Self-Signed Certificate with another Subject and Subject Alternative Names to make sure it can be used in your Exchange organization.
Using the Exchange Management Shell cmdlet New-ExchangeCertificate, you can create for example a certificate with Common Name webmail.proexchange.global, and then specify Subject Alternative Names like the Exchange server its Host and Fully Qualified Domain Name, as seen in Figure 10.
Do not forget to add the boolean parameter PrivateKeyExportable and set it to True, if you want to be able to export this Self-Signed certificate to enable your users to trust it (full details on this in part 2 of the article).


Figure 10: Generating a new Self-Signed Certificate with customized Subject Alternative Names
In part 2 of this article, I will come back to the required names of a certificate. In part 3 I will explain in more detail the used cmdlets.
Self-Signed Certificate are only trusted by its issuer
It is very important to know that the Self-Signed certificate is only trusted by the issuer of the certificate itself, which could break Exchange functionality if not configured correctly. Let us see what you need to consider if you decide to use the Self-Signed certificate:
Outlook Anywhere and Exchange ActiveSync do not support the use of a self-signed certificate
The Autodiscover web service will not check if the issuer of the certificate is trusted when launching Microsoft Office Outlook 2007 from a domain-joined client pc, but will complain about the certificate if you are using Microsoft Office Outlook 2007 from a non-domain-joined client pc, as shown in Figure 11.
 Figure 11: Self-Signed certificate not trusted

When Microsoft Office Outlook 2007 clients (domain-joined or not) use the Exchange Web Services provided by the Microsoft Exchange Client Access server, they will be prompted by Outlook that the certificate is not issued by a company they have chosen not to trust. Figure 12 shows the Security Alert shown when someone requests Free and Busy information.


Figure 12: Self-Signed Certificate not trusted
Microsoft does support the use of Self-Signed certificates, but only for internal scenarios, like:
- To encrypt SMTP sessions between Hub Transport servers in different sites;
- To encrypt SMTP sessions between Hub Transport servers and Edge Transport servers;
- To encrypt the synchronization of configuration and recipient information by configuring EdgeSync between internal Hub Transport servers and Edge Transport server(s);
- To encrypt SMTP sessions between Unified Messaging servers and Hub Transport servers;
- To encrypt SIP and RTP sessions between Unified Messaging servers and Office Communications servers (this does require you to make sure that the Office Communication Mediation server trusts your Exchange server as the issuer of that Self-Signed certificate);
- To encrypt internal client access to Exchange (POP,IMAP,Outlook Web Access).
If you do not want Exchange to generate a self-signed certificate during installation, you can specify the /NoSelfSignedCertificates parameter next to Setup in the command prompt. Be careful: this parameter can only be used when installing the Client Access server role or the Unified Messaging server role. If your server does not have a valid certificate available to encrypt communication between clients and the Client Access server or the Unified Messaging server, communication will be unencrypted, and therefore, insecure.
How to trust the Self-Signed Certificate?
As seen in part 1 of this article, it is supported and possible to configure Exchange to use the self-signed certificate for internal scenarios. In order to make sure your clients do not get any security alert when connecting to the Exchange 2007 Client Access server, it is necessary however that you get your users to trust the self-signed certificate. Remember, it is absolutely NOT a good idea to educate your users to discard security alerts! Figure 1 shows that the Self-Signed certificate is not trusted when using Outlook Web Access.


Figure 1: Self-Signed certificate not trusted
There are a few methods available to make sure your users recognize the Self-Signed certificate as a trusted one. I will only cover one method, which does not require any action from the users themselves, and that is publishing the Self-Signed certificate using Group Policies. Keep in mind however that you will need to repeat this action every time you renew the self-signed certificate!
1. Export the Self-Signed certificate
To export the Self-Signed certificate, you can use the Exchange Management Shell cmdlet Export-ExchangeCertificate. Since this will include the private key automatically you need to define a password, which I did in the example shown in Figure 2, by defining a secure string variable $pwd. Please note that you can only export a self-signed certificate if you have marked the certificate to have an exportable private key (as covered in Part 1 of this article).


Figure 2: Export Self-Signed certificate
2. Publish Self-Signed certificate as trusted via Group Policy
It is possible to publish the exported certificate in a user's personal store by using Group Policies. In the following example, I have started the Group Policy Management console to create a new group policy and apply it to the domain
(Figure 3).

(Figure 3).

Figure 3: Create and link a new GPO to the domain
I called the new GPO Trust Self Signed Certificate, and I am not using any Source Starter GPO (Figure 4).


Figure 4: Name New GPO
Since I want to import the exported Self-Signed certificate, I drill down to User Configuration, Policies, Windows Settings, Public Key Policies, and right-click Trusted People to start the Certificate Import Wizard (Figure 5).


Figure 5: Start the Certificate Import Wizard
I specify the file I previously created by running Export-ExchangeCertificate, and click Next to continue (Figure 6).


Figure 6: Select File to Import
Next, I enter the password I used to export the private key, and click Next to continue (Figure 7).


Figure 7: Type the password used to protect the private key
The certificate store where the certificate will be stored is set to Personal Store, I click Next to continue (Figure 8).


Figure 8: Select Certificate Store where certificate will be kept
To finish I click Finish after reviewing the given settings (Figure 9).


Figure 9: Completing the Certificate Import Wizard
The Certificate Import Wizard will tell me that the import completed successfully. When clicking OK and the import is done, and the group policy is ready to be applied (Figure 10).

Figure 10: The import was successful
Next time a user logs in to the domain, or the group policy refresh kicks in, the Self-Signed certificate will be marked as trusted. As can be seen when gaining access to Outlook Web Access (Figure 11).


Figure 11: Self-Signed certificate = Trusted
Getting a certificate from a public certification authority
Even though Exchange 2007 does generate a self-signed certificate during installation, and you can enable clients to trust it, you need to keep in mind what I wrote in the first part of this article:
Self-Signed certificates are only valid for one year
Self-Signed Certificate are only trusted by its issuer
Self-Signed Certificates are not supported for Outlook Anywhere nor Exchange ActiveSync
Therefore it is recommended that you get yourself a certificate from a certification authority. You can choose to deploy your own certification authority, or you could get a certificate from a public certification authority. It is recommended by Microsoft to get a certificate from a public certification authority in the following situations:
External client access to Exchange (POP, IMAP, Outlook Web Access, Outlook Anywhere, Exchange ActiveSync, Autodiscover)
If you want to setup Domain security with partner organizations
If you do get a certificate from a public certification authority, you will save yourself a lot of administrative hassle of getting your certification authority recognized as a trusted one by non-domain joined clients, and/or partner organizations that want to configure domain security with your Exchange environment.
Microsoft has published a knowledge base article (Unified Communications Certificate Partners for Exchange 2007 and for Communications Server 2007) with a list of certification authorities that issue Unified Communications Certificates for Microsoft Exchange and for Communications Server 2007, which can be used to deploy the Domain Security feature.
What is a public certification authority?
Public certification authorities, otherwise referred to as root certification authorities, are certificate issuers that are trusted by practically all mainstream browsers and applications, thereby eliminating the need to get the certification authority trusted. When you decide to get a certificate from a public certification authority, you need to consider if the public certification authority is considered trusted by all applications you will be using and if it can get you the certificate you need (thinking about names, validity date, and so on).
Names to have in a certificate
Looking at a certificate, and why a certificate is not accepted to be used for encryption and authentication by Exchange, it usually boils down to any of the following four reasons:
The security certificate must be issued by a trusted certification authority;
The security certificate must not be revoked by the certification authority that issued it;
The security certificate must not be expired;
The security certificate comes with a name that does not match the expected name.
Even though some applications, like Outlook Web Access, allow you to use the certificate even though the certificate is not issued by a trusted CA, or the security certificate was issued for a different website's address, it is not recommended to ignore these warnings since it could mean that someone or some process is trying to fool you or intercept any data, as stated clearly by Microsoft Internet Explorer 7 (Figure 12).


Figure 12: Security Certificate Warning
Outlook Anywhere and Exchange ActiveSync will not function if there is any problem with the certificate (Figure 13).


Figure 13: Outlook Anywhere fails to connect since the name of the security certificate does not match the name of the target site
Let us have a look at the names you need for a security certificate for your Client Access server:
NetBIOS name of your Client Access server;
Full Qualified Domain Name of your Client Access server;
Autodiscover domain name(s) of your Exchange organization;
Name used to publish Outlook Web Access, Outlook Anywhere, Exchange ActiveSync, Pop, and/or IMAP to external clients.
Names you need for a security certificate for your Hub/Edge Transport server:
Fully Qualified Domain Name of your Hub Transport server;
All accepted domain names in your Exchange organization.
And for the Unified Messaging server, you just need the Fully Qualified Domain Name of your Unified Messaging server role.
Example situation
Image you have got an environment as pictured below in Figure 14.


Figure 14: Example Exchange organization
In this Exchange environment, you will publish both Outlook Web Access, and Outlook Anywhere using your ISA server located in the DMZ. Mails sent to and from your organization pass your Exchange Edge server role, also located in the DMZ. Your Exchange organization has two domains for which it is responsible: ProExchange.Global and BelgianBeers.Rock. You have agreed to configure Domain Security between your Exchange organization and one of your partners organization Sunshine.Edu. EdgeSync is configured to replicate your configuration and recipient information to the Edge server. You will acquire two certificates from a public trusted CA, one to publish Outlook Web Access and Outlook Anywhere and one setting up domain security between your Exchange organization and Sunhine.Edu.
Table 1 lists the Exchange servers that exist in this Exchange environment, and their roles.
| FQDN Exchange Server | Exchange Server 2007 Sp1 (RU5) roles installed |
| Edge.ProExchange.dmz | Edge Server role |
| Ex2007EE.ProExchange.Global | Mailbox + Client Access + Hub Transport server role |
| Ex2007SE.ProExchange.Global | Unified Messaging server role |
Table 1
A closer look at your Exchange organization reveals the URL's listed in table 2 that are used from the outside and on the inside by users to connect to their mailbox.
| Connecting to | Connecting with HTTP(s) | Connecting using RPC |
| Outlook Web Access | https://webmail.proexchange.global https://webmail.belgianbeers.rock | https://Ex2007EE.proexchange.global |
| Outlook Anywhere | https://webmail.proexchange.global | https://Ex2007EE.proexchange.global |
| Free and Busy information | https://webmail.proexchange.global/EWS/Exchange.asmx | https://Ex2007EE.proexchange.global/EWS/Exchange.asmx |
| Download OAB | http://webmail.proexchange.global/OAB | http://Ex2007EE.proexchange.global/OAB |
| Change Unified Messaging settings | https://webmail.proexchange.global/UnifiedMessaging/Service.asmx | https://Ex2007EE.proexchange.global UnifiedMessaging/Service.asmx |
| Autodiscover | https://autodiscover.proexchange.global/autodiscover/autodiscover.xml https://autodiscover.belgianbeers.rock/autodiscover/autodiscover.xml | https://Ex2007EE.proexchange.global/Autodiscover/autodiscover.xml |
Table 2: URL's
These URLs can also be retrieved and changed using the Exchange Management Shell. Figure 15 shows the Exchange Management Shell cmdlets to retrieve the URLs provided by the Exchange web service Autodiscover to Microsoft Office Outlook 2007 clients.


Figure 15: InteralUrl and ExternalUrl configuration settings
Table 3 lists the records that are registered in DNS.
| Name | Type | Data |
| Autodiscover.ProExchange.Global | Alias (CNAME) | Webmail.ProExchange.Global |
| Autodiscover.BelgianBeers.Rock | Alias (CNAME) | Webmail.BelgianBeers.Rock |
| Webmail.ProExchange.Global | Host (A) | External IP ISA Server |
| Webmail.BelgianBeers.Rock | Host (A) | External IP ISA Server |
| ProExchange.Global | Mail Exchanger (MX) | [10] Edge.ProExchange.Dmz |
| BelgianBeers.Rock | Mail Exchanger (MX) | [10] Edge.ProExchange.Dmz |
| Edge.ProExchange.Dmz | Host (A) | External IP Edge Server |
| Ex2007SE.ProExchange.Global | Host (A) | 10.10.10.102 |
| Ex2007EE.ProExchange.Global | Host (A) | 10.10.10.101 |
Table 3: Registered records in DNS
To enable secure access to Outlook Web Access and publish Outlook Anywhere, the following names have to be present on the certificate that you will enable for the service IIS on your internal Client Access Server and export to your ISA 2006 Sp1 server:
Common Name = Webmail.ProExchange.Global, Outlook Anywhere requires the common name to match the external host name used to enable Outlook Anywhere
Subject Alternative Names:
Webmail.ProExchange.Global
Webmail.BelgianBeers.Rock
Autodiscover.ProExchange.Global
Autodiscover.BelgianBeers.Rock
Ex2007EE.ProExchange.Global
Ex2007EE
Ex2007SE.ProExchange.Global
Ex2007SE
Webmail.ProExchange.Global
Webmail.BelgianBeers.Rock
Autodiscover.ProExchange.Global
Autodiscover.BelgianBeers.Rock
Ex2007EE.ProExchange.Global
Ex2007EE
Ex2007SE.ProExchange.Global
Ex2007SE
To enable EdgeSync, offer opportunistic TLS and configure domain security with your partner organization Sunshine.Edu, you need a certificate for your Microsoft Exchange Edge server role with the following names:
Common Name = Edge.ProExchange.Dmz
Subject Alternative Names:
ProExchange.Global
BelgianBeers.Rock
ProExchange.Global
BelgianBeers.Rock
In part three of this article I will provide you with detailed steps on how to create a certificate request with Subject Alternative Names, and how to import and enable the acquired certificate for your Exchange services.
Exchange Cmdlets for managing certificates
Exchange Management Shell offers you a set of cmdlets you can use to manage certificates in your Exchange environment:
Enable-ExchangeCertificate
Export-ExchangeCertificate
Get-ExchangeCertificate
Import-ExchangeCertificate
New-ExchangeCertificate
Remove-ExchangeCertificate
In part 2 of this article series, I described a given Exchange organization, for which we need to get 2 Exchange certificates, as summarized in Table 1 below.
| Common Name | Subject Alternative Names | Required for Services |
| Webmail.proexchange.global |
Webmail.ProExchange.Global
Webmail.BelgianBeers.Rock
Autodiscover.ProExchange.Global
Autodiscover.BelgianBeers.Rock
Ex2007EE.ProExchange.Global
Ex2007EE
Ex2007SE.ProExchange.Global
Ex2007SE
|
Outlook Web Access
Outlook Anywhere
Autodiscover
EWS (Out of Office, Free and Busy)
|
| Edge.proexchange.dmz |
ProExchange.Global
BelgianBeers.Rock
|
EdgeSync
Opportunistic TLS
Domain Security
|
Table 1: Certificate Requirements
New-ExchangeCertificate
The Exchange Management Shell cmdlet New-ExchangeCertificate can be used to create a new self-signed certificate or can be used to create a new certificate request, which can be forwarded to your Certification Authority and afterwards imported and enabled for SMTP (Transport Layer Security (TLS)) and/or IIS, POP, IMAP, and UM (so-called Secure Sockets Layer (SSL) services).
The key parameter that will cause the cmdlet New-ExchangeCertificate to generate a new self-signed certificate or to generate a request, is called GenerateRequest. If you omit this parameter, a new self-signed certificate will be created by Exchange, as can be seen in Figure 1. If you add this parameter, Exchange will create a certificate request for a PKI certificate (PKCS #10) in the local request store.


Figure 1: Create a new Self-Signed Certificate
When creating a certificate request, the following list of parameters can be added:
SubjectName - entered as a X.500 distinguished name, which contains the most important property of a certificate, the common name. The subject name is the field that is used by DNS-aware services, and will actually reassure the DNS-aware service that the certificate has indeed been issued for the requested server or domain name;
DomainName - used to add any additional Subject Alternative Names to the certificate. You can add multiple domain names separated by a comma, but every domain name itself is limited to 255 characters each;
IncludeAcceptedDomains - will add all accepted domains configured in the Exchange organization as subject alternative name (when names are defined both using the DomainName parameter, and using this switch parameter IncludeAcceptedDomains, they will only appears once in the certificate request)
IncludeAutoDiscover - will add for every domain name the subject alternative name autodiscover.domainname. Two side notes here:
- When names are defined both using the DomainName parameter, and using this switch parameter IncludeAutodiscover, they will only appears once in the certificate request
- This parameter can only be added when running the cmdlet on an Exchange Client Access server
- When names are defined both using the DomainName parameter, and using this switch parameter IncludeAutodiscover, they will only appears once in the certificate request
- This parameter can only be added when running the cmdlet on an Exchange Client Access server
Keysize - can be used if you want to specify a different size of the RSA public key associated with the certificate you are creating. If omitted, a default value of 2048 bits will be taken, but you can add the parameter and set the value to 1024 bits, 2048 bits, or 4096 bits;
Path - where you want the certificate request to be stored. You need to specify both the path and a filename (file type .req);
PrivateKeyExportable - can be used to generate a certificate (and/or request) with an exportable private key. If omitted, the private key will not be exportable. By adding this parameter and setting its value to True, you will be able to export the certificate and import it on another Exchange server and/or ISA box;
BinaryEncoded - can be used to change the by default via Base64 encoded export file to a DER-encoded file;
Services - can only be used when generating a new self-signed certificate to define which services (IIS,SMTP,POP,IMAP,UM) will use the new self-signed certificate. Default value for this parameter is set to SMTP (as can be seen in Figure 1), by setting its value to None you can generate a new self-signed certificate without enabling it for any service;
FriendlyName - can be used to give your certificate another name than the default "Microsoft Exchange", it is limited to 64 characters.
Given our Exchange organization, we need to create two certificate requests. As can be seen in Figure 2, both certificate requests will be generated on our Exchange HUB/CAS/MBX server, called Ex2007EE. One certificate request, called secure_smtp.req will be used for SMTP, and the other one, called secure_client.req will be used for IIS, and UM. To make sure both certificates can be exported and shared, the private key will be set to be exportable.


Figure 2: New-ExchangeCertificate
These two certificate requests can now be delivered to the certification authority of choice, and after receiving the certificates, they can then be imported and enabled for the required services.
Enabling EdgeSync, check the following TechNet article
When enabling EdgeSync you need to keep the following TechNet article in mind, entitled "EdgeSync Fails with Event ID 10104", which clearly states that the Hub and Edge Transport servers do not support the use of the same certificate!
Import-ExchangeCertificate
The Import-ExchangeCertificate cmdlet allows you to import a certificate, which can be useful when:
you want to import a previously exported certificate
you want to import a certificate file generated by a certification authority
There are two important parameters which you should remember when running the cmdlet Import-ExchangeCertificate:
Password - to enter the password that was used to encrypt the private key when exporting the certificate
Path - to specify the location where you stored the certificate file received from a CA
Once the certificate has been imported, you need to enable it for a service, by running the cmdlet Enable-ExchangeCertificate.
Enable-ExchangeCertificate
By running the cmdlet, Enable-ExchangeCertificate, you will enable a certificate for one or more services by updating the metadata stored with the certificate.
Every service has different metadata requirements, and will have different properties updated:
POP3-IMAP4: msExchPopImapX509CertificateName property will be updated;
IIS: Default Web Site will be updated;
SMTP: the Network Service account will be granted Read access to the appropriate private file key in the directory Documents and Settings\All Users\Application Data\Microsoft\Crypto\RSA\MachineKeys;
UM: certificate property will be updated to include Unified Messaging.
After receiving our two requested certificates, you can see in Figure 3 that they are imported, and in the same line, enabled for their required services.


Figure 3: Import-ExchangeCertificate
Get-ExchangeCertificate
To get a list of all certificates that are available in your local certificate store, you can run the cmdlet Get-ExchangeCertificate. You can use this cmdlet to review the certificate fields that are used by the Exchange services (Figure 4) like:
Issuer: who issued the certificate
Subject: Common Name of the certificate
CertificateDomains: Subject Alternative Names defined on the certificate
NotBefore: defines the date and time from when the certificate can be used
NotAfter: defines the date and time when the certificate expires
IsSelfSigned: to see if the certificate is a self-signed certificate or not
RootCAType: defines the kind of CA that issued the certificate
Services: for which services the certificate is enabled for
Status: defines if the certificate is valid or not
Thumbprint: a digest of the certificate data


Figure 4: Get-ExchangeCertificate (SMTP)

Figure 5: Get-ExchangeCertificate (IIS,POP,IMAP)
Export-ExchangeCertificate
In order to export a certificate (whether for backup purposes, or for using it on multiple servers), you can use the cmdlet Export-ExchangeCertificate. Running the cmdlet will export an exchange certificate and its private key by default.
It is also possible to use this cmdlet as well to export a certificate request. When running the cmdlet, Exchange will investigate the certificate to export (by using its thumbprint), and if it is a certificate request export it as a PKCS #10 file. If it is a certificate, the certificate will be exported to a PKCS #12 file.
There are two parameters to be kept in mind when running the cmdlet Export-ExchangeCertificate:
Path: to define a target location and file name to store the exported file, remember to enter a .req file extension for exporting a certificate request, and .pfx or .p12 for exporting a certificate;
Password: to protect the private key, has to be entered as a secure string (different methods can be used to set the password, as can be seen in Figure 6 and 7).
In our Exchange organization, I need to export both certificates to make sure they can be used multiple times. First I will export the one used for providing TLS, and import it on the Edge server role and enable it for SMTP, as shown in Figure 6. Then I will export the one used for IIS, POP, and IMAP, and import it on my Unified Messaging Server role, to enable it for UM, as shown in Figure 7 and 8, and I will import it and configure ISA to use it for publishing Outlook Web Access, and Outlook Anywhere.


Figure 6: Export-ExchangeCertificate (SMTP)

Figure 7: Export-ExchangeCertificate (IIS,POP,IMAP)

Figure 8: Import-ExchangeCertificate (UM)
Remove-ExchangeCertificate
Once you have enabled the required certificates for every service, you can choose to remove any un-needed certificate from Exchange server and the local certificate store by running the cmdlet Remove-ExchangeCertificate. If the certificate that you are removing is stored in Active Directory directory service, this instance will be removed as well.
Figure 9 shows you how you can remove all self-signed certificates at once.


Figure 9: Remove-ExchangeCertificate (Self-Signed)
Validate your Certificate configuration
After getting the required certificates, and configuring your Exchange services to use them, it is time to test if everything is working as planned.
Figure 10 shows you that Outlook Web Access and Outlook Anywhere work fine, using the required certificate.


Figure 10: Certificate properties
And the desired Domain Security feature with organization Sunshine.Edu, is configured as planned, as can be seen in Figure 11 and 12.


Figure 11: Domain Security

Figure 12: Domain Security
No comments:
Post a Comment